autoworks24.com

Convolutional Neural Networks (CNNs) Python

550.00฿

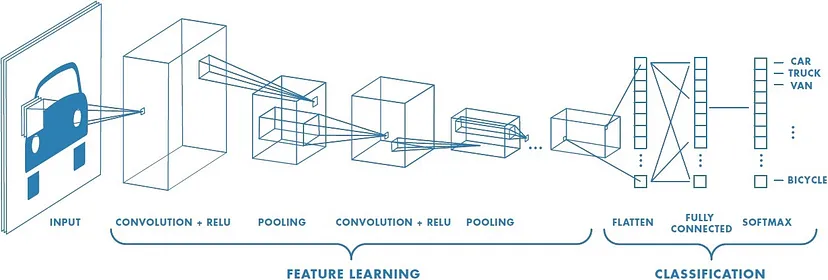
Convolutional Neural Networks (CNNs) are a type of deep learning algorithm particularly well-suited for image processing tasks. Here’s a basic guide to implementing a CNN in Python using the popular deep learning library, TensorFlow with Keras.

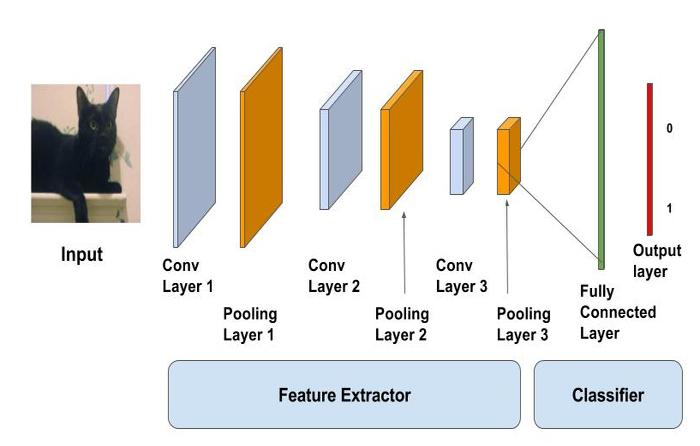
1. Install Required Libraries

Make sure you have TensorFlow installed. If not, you can install it using pip:

bash

pip install tensorflow

2. Import Libraries

python

import tensorflow as tf
from tensorflow.keras import datasets, layers, models
import matplotlib.pyplot as plt

3. Load and Preprocess Data

For demonstration purposes, we’ll use the CIFAR-10 dataset, which is a collection of 60,000 32×32 color images in 10 classes, with 6,000 images per class.

python

# Load CIFAR-10 dataset
(train_images, train_labels), (test_images, test_labels) = datasets.cifar10.load_data()

# Normalize pixel values to be between 0 and 1
train_images, test_images = train_images / 255.0, test_images / 255.0

4. Build the CNN Model

python

model = models.Sequential()

# First convolutional layer
model.add(layers.Conv2D(32, (3, 3), activation='relu', input_shape=(32, 32, 3)))
model.add(layers.MaxPooling2D((2, 2)))

# Second convolutional layer
model.add(layers.Conv2D(64, (3, 3), activation='relu'))
model.add(layers.MaxPooling2D((2, 2)))

# Third convolutional layer
model.add(layers.Conv2D(64, (3, 3), activation='relu'))

# Flatten the results to feed into a dense layer
model.add(layers.Flatten())
model.add(layers.Dense(64, activation='relu'))
model.add(layers.Dense(10))

5. Compile and Train the Model

python

model.compile(optimizer='adam',
loss=tf.keras.losses.SparseCategoricalCrossentropy(from_logits=True),
metrics=['accuracy'])

history = model.fit(train_images, train_labels, epochs=10,
validation_data=(test_images, test_labels))

6. Evaluate the Model

python

test_loss, test_acc = model.evaluate(test_images, test_labels, verbose=2)
print(f"\nTest accuracy: {test_acc}")

7. Plot Training and Validation Accuracy

python

plt.plot(history.history['accuracy'], label='accuracy')
plt.plot(history.history['val_accuracy'], label = 'val_accuracy')
plt.xlabel('Epoch')
plt.ylabel('Accuracy')
plt.ylim([0, 1])
plt.legend(loc='lower right')
plt.show()

This basic CNN model should provide a good starting point for image classification tasks. You can further improve the model by adding more layers, using different architectures, or employing various regularization techniques.

Would you like a more advanced example or details on any specific part of this process?

คำอธิบาย

Convolutional Neural Networks (CNNs) are a type of deep learning algorithm particularly well-suited for image processing tasks. Here’s a basic guide to implementing a CNN in Python using the popular deep learning library, TensorFlow with Keras.

1. Install Required Libraries

Make sure you have TensorFlow installed. If not, you can install it using pip:

bash

pip install tensorflow

2. Import Libraries

python

import tensorflow as tf
from tensorflow.keras import datasets, layers, models
import matplotlib.pyplot as plt

3. Load and Preprocess Data

For demonstration purposes, we’ll use the CIFAR-10 dataset, which is a collection of 60,000 32×32 color images in 10 classes, with 6,000 images per class.

python

# Load CIFAR-10 dataset
(train_images, train_labels), (test_images, test_labels) = datasets.cifar10.load_data()

# Normalize pixel values to be between 0 and 1
train_images, test_images = train_images / 255.0, test_images / 255.0

4. Build the CNN Model

python

model = models.Sequential()

# First convolutional layer
model.add(layers.Conv2D(32, (3, 3), activation='relu', input_shape=(32, 32, 3)))
model.add(layers.MaxPooling2D((2, 2)))

# Second convolutional layer
model.add(layers.Conv2D(64, (3, 3), activation='relu'))
model.add(layers.MaxPooling2D((2, 2)))

# Third convolutional layer
model.add(layers.Conv2D(64, (3, 3), activation='relu'))

# Flatten the results to feed into a dense layer
model.add(layers.Flatten())
model.add(layers.Dense(64, activation='relu'))
model.add(layers.Dense(10))

5. Compile and Train the Model

python

model.compile(optimizer='adam',
loss=tf.keras.losses.SparseCategoricalCrossentropy(from_logits=True),
metrics=['accuracy'])

history = model.fit(train_images, train_labels, epochs=10,
validation_data=(test_images, test_labels))

6. Evaluate the Model

python

test_loss, test_acc = model.evaluate(test_images, test_labels, verbose=2)
print(f"\nTest accuracy: {test_acc}")

7. Plot Training and Validation Accuracy

python

plt.plot(history.history['accuracy'], label='accuracy')
plt.plot(history.history['val_accuracy'], label = 'val_accuracy')
plt.xlabel('Epoch')
plt.ylabel('Accuracy')
plt.ylim([0, 1])
plt.legend(loc='lower right')
plt.show()

This basic CNN model should provide a good starting point for image classification tasks. You can further improve the model by adding more layers, using different architectures, or employing various regularization techniques.

Would you like a more advanced example or details on any specific part of this process?